Tuesday, June 21, 2011

Make your own Granola Bars

I was in the mood for a granola bar one day so I decided to look up recipes and try to make them myself! This was a first time for me ( as most of the recipes on my blog are my firsts) and I think I will continue to make them and find a recipe I really like! I will share with you this one! The purpose of my blog is not to show off how I am a fabulous cook, because I am not. haha. This blog is to show a journey of a young wife( crazy to say that I am a wife now!! eeee!) learning how to cook new things and find great recipes! Even make some of her own recipes along the way! Also this blog is to inspire the people in my life, young and old to try new things and for me to learn from those who know MUCH more than I do. Anyways, my point was to say that I am not in love with this recipe and I am on the hunt to find a better, more healthy one! So if you have any recipes, send them my way! Thats what this blog is about :)
Okay lets get started!
You shall need:

  • 4 1/2 cups rolled oats


  • 1 cup all-purpose flour


  • 1 teaspoon baking soda


  • 1 teaspoon vanilla extract


  • 2/3 cup butter, softened


  • 1/2 cup honey


  • 1/3 cup packed brown sugar


  • 2-3 cups of whatever you want to put in it! -Raisins, chocolate chips, seeds, peanuts, almonds, walnuts, craisins...etc.


  • Directions:
    1. Preheat oven to 325F. Lightly grease one 9x13 inch pan.
    2. In a large mixing bowl combine the oats, flour, baking soda, vanilla, butter or margarine, honey and brown sugar. Stir in the 2-3 cups of assorted chocolate chips, raisins, nuts etc.
    3. Lightly press mixture into the prepared pan. Bake at 325 degrees F (165 degrees C) for 18 to 22 minutes or until golden brown. Let cool for 10 minutes then cut into bars. Let bars cool completely in pan before removing or serving.

    enjoy! xo

    Wednesday, June 15, 2011

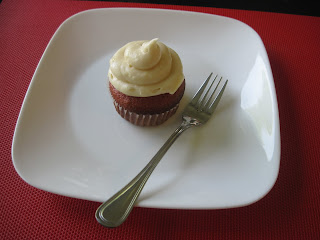
    Red Velvet Cupcakes with Cream Cheese Icing

    I had never made red velvet before, but ever since my friends red velvet wedding cake I have been dying for another taste! If you have never had red velvet, it is a MUST try. Something about the red cake-ness that just makes it so...yummy! It was a yummy treat to have and to give our friends. Here is how you can make it too!
     Ingredients!
    -3 eggs
    -3/4 cup of butter
    -3 cups of all purpose flour
    -1 tbsp unsweetended cocoa powder
    -3/4 tsp salt
    -2 1/4 cups of sugar
    -2 tablespoons of red food colouring ( I didn't believe it and I used less than that...BUT at the end of the day my cupcakes were not as RED as I wanted...so next time I will actually follow the recipe! I am so bad for that!)
    -1 1/2 tsp vanilla
    -1 1/2 cups of buttermilk or sour milk
    -1 1/2 tsp baking soda
    -1 1/2 tsp vinegar
    -1 cream cheese icing recipe

    LETS GET STARTED :)
    Step one.
    Allow your eggs and butter to sit at room temperature for 30 minutes. Meanwhile put the muffin cups in the muffin trays and set aside. This recipe makes 24 scrumptious cupcakes.
    Step two.
    In a medium bowl stir together flour, cocoa powder and salt. set aside.
    Step three.
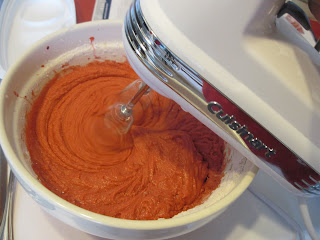
    Preheat your oven to 350F. In a very large mixing bowl beat the butter with an electric mixer on med-high speed for 30 seconds. Gradually add sugar, about 1/4 cup at a time. Continue to beat on medium speed until it is well combined. Scrape the sides of the bowl, beat on medium for another 2 minutes. Add the eggs, one at a time. Beating well after each addition. Beat in red food colouring and vanilla.

    Step four.
    Alternately add flour and sour milk. beating on low speed after each addition. Beat on low until combined.

    Step five.
    In a small bowl combine the baking soda and vinegar. Then you fold it into your batter. Next, you evenly pour your red batter into the muffin cups, like so.

    Step six.
    Bake these bad boys for 18 minutes. Make sure you check with a tooth pic to see if they are done. TIP: Do not talk on the phone while you are baking!! Or at least don't forget that you are baking. You will most likely forget to take out your baked goods... like I did with these cupcakes, I left them in for an extra 6 or 7 minutes :( Don't make my same mistake! Mine were a little brown around the edges.
    VOILA!

    Now time to ice them!

    Cream cheese frosting recipe!
    You will need:
    -1 pkg of cream cheese.. I used the low fat one.
    -1/2 cup of butter, softened
    -2 tsp vanilla
    -5 to 6 cups of powdered sugar
    (and a pinch of salt)

    mmmm
    In a large mixing bowl beat the cream cheese, butter and vanilla with an electric mixer on medium speed until light and fluffy.

    Gradually beat in the powdered sugar until you reach a spreading consistancy! Also add your pinch of salt.


    Now time to ice!
    Just a little tip when it comes to these delish cupcakes. We put alot of icing on them to make them look good. But we quickly learned that it was FAR too much. These cupcakes only need a little bit of icing. Also it will save you lots of calories.
    Just so you know...1/12 of this frosting recipe has 348 cals! and 14g of fat.
    So ice as you wish but in this case less is definately better than more!
    Enjoy!
    xo

    Thursday, June 9, 2011

    Pesto Pasta with Roasted Tomatoes


    This was a scrumtious dinner. Very rich, and you will enjoy every bite! To start you are going to need all of these ingredients!
    -pasta of your choice!
    -2 or 3 whole tomatoes
    -salt and pepper
    -1/2 cup of extra virgin olive oil
    -2 cups of fresh basil
    -1/3 of a cup of pine nuts or walnuts
    -3 medium sized garlic cloves, minced
    -1/2 cup of parmesan cheese
    -black olives
    -mushrooms
    -2 handfulls of baby spinach
    -shrimp or chicken (bite size pieces)
    -mozerella cheese, cubed ( totally not necessary, but tasty)

    Lets get started! First things first I started with my tomatoes! Preheat the oven to 400F
    Slice them, lay them out on tin foil on a medium to large pan and then brush with olive oil.
    Next sprinkle sea salt and pepper on them.
    Put them in the oven and let them bake for about 40 minutes until wrinkly and softened. Here are how mine turned out!


    PESTO TIME! While your tomatoes are roasting you can make your pesto. It is best to use a food processor BUT we don't have one of those yet. A blender will do just fine. First take your pine nuts or walnuts and put them in the blender. Grind up until fine. Then add your 2 cups of fresh basil.
    I AM IN LOVE WITH OUR NEW BLENDER !!
    Okay next you add the parmesan cheese, the garlic and the 1/2 cup of extra virgin olive oil.

    Lastly, salt and pepper to taste and VOILA! PESTO!!
    PASSSSTTTAAA TIME.
    Now it is time to get your favourite pasta noodle going. Get it cooking :)
    In the mean time, on a frying pan sautee your mushrooms and spinach in a bit of olive oil. (a very little bit)
    I used about 4 or 5 large mushrooms.
    It is time to prepare your meat that you are going to use. We had leftover shrimp so that was easy. If using chicken you should cut it into bite size pieces and cook them on the stove top.
    Also cut up your olives, and your cheese if using it.
    Get a large, colourful bowl and start adding your ingredients. once the mushrooms and spinach are cooked (which does not take long at all) all them to the bowl. Your cooked and drained noodles, olives, cheese, shrimp or chicken then lastly your pesto. TIP: Pesto is rich, especially this recipe. You may not need to use all of the pesto...we only used about 3/4 of it.


    Garnish with your roasted tomatoes and fresh basil. ENJOY every bite!

    xo


    Wednesday, June 8, 2011

    Rich and Creamy Butternut Squash Soup with Maple

    At our wedding we ate a DELICIOUS butternut squash and maple soup...So I am on a mission to try and recreate it! I looked online at a bunch of recipes and I played around with them and I came up with this recipe. We love this soup and make it often.

    THIS MAKES 4 SERVINGS.

    To make this sweet and creamy soup you will need:


    • 2 carrots, chopped
    • 2 tbsp butter
    • celery
    • one large onion, chopped
    • 2 potatoes, peeled and chopped
    • 1 butternut squash, de-seeded, peeled and chopped
    • 1 tsp minced garlic
    • 1 tsp cinnamon
    • 3 cups of chicken broth
    • 1 cup of cooking cream ( or milk for a lighter version)
    • 1-2 tbsp of maple syrup
    • salt and pepper to taste


    STEP ONE
    Put the butter, celery and onion into a large pot. Let simmer on medium high..stirring frequently.
    STEP TWO
    Add the chopped up carrots, potato and squash. Let them simmer until you notice the squash becoming a darker, more rich colour.

    STEP THREE
    Add the chicken broth and let it boil. You want the potatoes, squash and the carrots to become soft and mashable. At the same time add the garlic and the cinnamon.

    STEP FOUR
    Once the potatoes, squash and carrots are soft and mashable, drain the liquid out of the pot. As you drain the liquid out, put it in a container and set it aside.  It has the cinnamon in it and we still want to use it! Once you have done that, it is time to mash everything together with an electric mixer ( or in a food processor)

    STEP FIVE
    Once the vegetables have been well mixed and mashed together you can add back 3/4 of the liquid you took out and one cup of table cream. Also add in your 1 to 2 tbsp of maple syrup! Add your salt and pepper to taste. Stir until you find the right consistency.


    Now EAT and ENJOY!

    xo

    Tuesday, June 7, 2011

    Strawberry Chocolate Cream Cheese Cake

    This one is SO good! My brother and I made it for our mom for mothers day. It went pretty quickly, everyone loved it!
    Here is what you will need to make one of these vanilla cakes yourself:
    -1 3/4 all purpose flour
    -1 tbsp baking powder
    -1/2 tsp salt
    -1/2 cup of butter or shortening
    -1 cup of sugar
    -2 eggs
    -1 tsp vanilla
    -3/4 cup of milk

    Preheat your oven to 350F.
    STEP ONE
    Combine your flour, baking powder and salt together. Then set aside.
    In a large mixing bowl cream butter with sugar. Add the eggs and vanilla and mix until light (they say it takes about 6 minutes)

    STEP TWO
    Blend in dry ingredients by alternating with milk. Beginning and ending with dry ingredients.

    STEP THREE
    Pour batter into buttered and floured cake pans. (round 8 inch cake pans)
    Bake for 30 to 35 minutes or until the tooth pick comes out clean.
    Cool in pan for 10 minutes then remove and let stand on wire racks for 45 minutes.
    Icing time!
    We decided to make a cream cheese icing and use strawberries for the center and to decorate the top. The cream cheese icing was delicious, I enjoyed it much more than the butter icing that I used for the easter cake.
    Here is what you will need!
    -2 1/2 cups of icing sugar
    -1/2 cup of soft butter or margarine
    -1 pkg of cream cheese at room temperature
    -1 tsp of vanilla

    Sift Icing sugar and let it sit. In another bowl cream butter and cream cheese together. Add vanilla. Beat in the icing sugar gradually until you have reached a spreading consistancy. The icing is done!!

    What we did for the center of the cake is we took some of the icing and added cut up strawberries. Then we blended it together. Be careful not too add to many strawberries. It can make the icing very liquidy, and thats not what we want.


    Then ice your cake! It can be a bit of a challenge so take yout time!

    Once your happy with your icing you can decorate! We added strawberries to the to of the cake and we also melted down chocolate chips as a final touch! voila! ENJOY!

    xo